

A small bathroom does not leave much room for mistakes. Even a few inches can affect where you place the toilet, sink or shower. Moving a pipe later can also add more work and cost.
A small bathroom plumbing diagram gives you a simple plan for the drains, water lines and fixtures before the work starts. This is useful in Toronto condos, where existing plumbing and building rules can affect where you can move things.
In this guide, we cover small bathroom plumbing measurements, shower layouts, common pipe sizes, costs and important points to check before starting your condo bathroom renovation.
Small Bathroom Plumbing Diagram Explained (With Visual Breakdown)
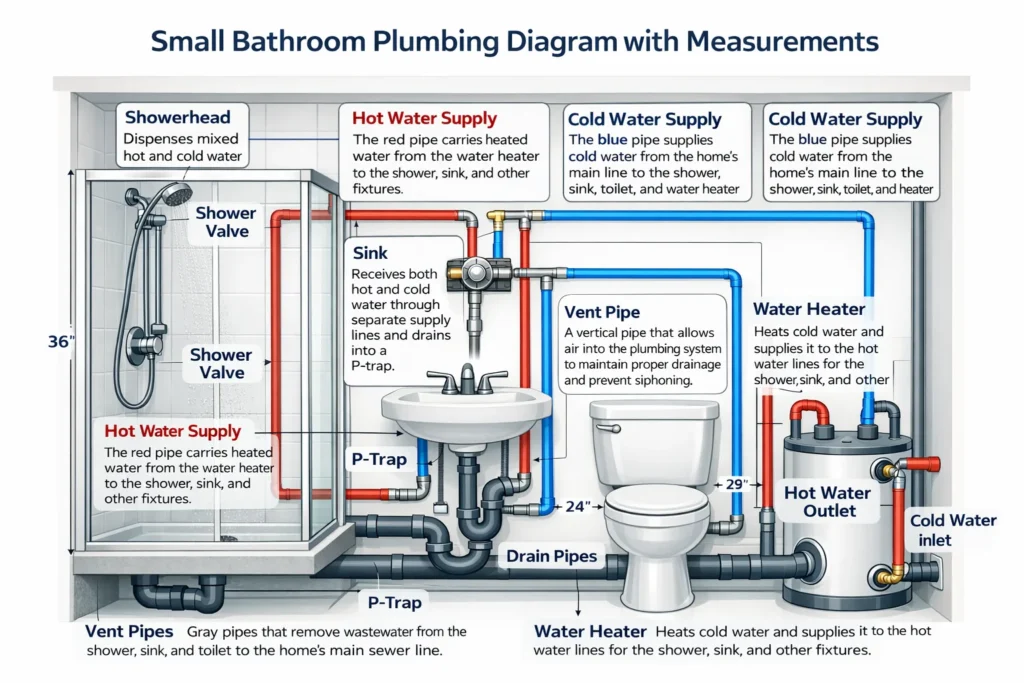
A small bathroom plumbing diagram is basically a simple drawing that lays out the connection points for your toilet, sink, and shower to water supply lines, drain pipes and the pipes that allow air in – the vent pipes. It lays out where the hot and cold water lines go, the drainage system and where your fixtures are hooked up to the rough-ins before any of the walls or floors get closed off.
In a small bathroom, space is tight so the plumbing layout has to be right just to keep the pipes from getting in each others way – this is especially important in places like condos in Toronto and homes in the GTA where most bathrooms are hooked up to the same shared plumbing system running up the side of the building.
Having a clear and accurate small bathroom plumbing diagram with measurements really helps prevent plumbing problems, slow water flow & costly work when you go to renovate. A clear plan in hand makes life a lot easier for homeowners and contractors alike – it helps you guys avoid all the headaches that come from having to redo things because you didnt do it right first time
Small Bathroom Plumbing Diagram With Measurements
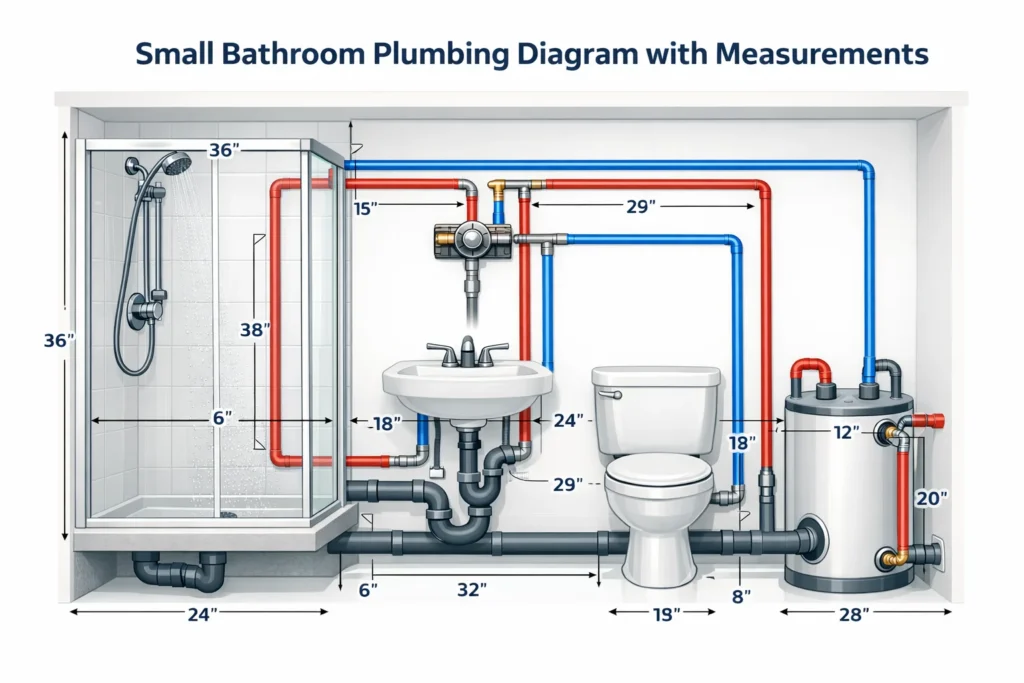
In a small bathroom, even a few inches can make a big difference. The toilet, sink and shower all need to fit well without making the room feel too tight. A small bathroom plumbing diagram with measurements shows where the drains, water lines and fixtures should go before the plumbing work starts.
The exact measurements can change based on your fixtures, bathroom size and local plumbing rules. The numbers below are common planning measurements. Always check the instructions for the fixtures you choose before the pipes are installed.
Toilet Rough-In Measurements
The toilet is one of the first fixtures to plan. The drain needs to line up with the toilet and the finished wall.
Common measurements include:
- Toilet rough-in: 12 inches from the finished wall to the centre of the toilet drain
- Other rough-in sizes: 10-inch and 14-inch sizes can be found in some older homes
- Side space: Keep at least 15 inches from the toilet centre to a wall or other fixed item
- Front space: Leave enough open space in front of the toilet for easy use
Always check the toilet model before setting the drain. Also, measure from the finished wall, not the wall framing.
Sink Rough-In Measurements
The sink drain and water lines need to work with your vanity and faucet. The exact height can change based on the sink and vanity you choose.
Common measurements include:
- Sink drain: Around 16 to 20 inches from the finished floor
- Water supply lines: Around 20 to 22 inches from the finished floor
- Hot and cold lines: Place them to match the faucet
- Side space: Leave enough room beside the sink for comfortable use
Good sink placement also helps keep the vanity from feeling too close to the toilet. Your small bathroom plumbing layout should show these pipe locations before work begins.
Shower Drain and Supply Line Placement
A small bathroom plumbing diagram with a shower should show the shower drain, valve and water lines. The layout should also match the shower base or tile design.
Common measurements include:
- Shower drain: Place it based on the shower base and manufacturer’s instructions
- Shower head: Around 72 to 80 inches from the finished floor
- Control valve: Around 40 to 48 inches from the finished floor
- Water lines: Place them to match the shower valve
The drain also needs the right slope so water can flow to the main drain. The required slope can depend on the pipe size and plumbing rules for the project.
Fixture Spacing in a Small Bathroom
Small bathrooms need careful planning because there is less space to work with. A 5×8 bathroom, for example, needs enough room for the toilet, vanity and shower without making the room hard to use.
Keep these points in mind:
- Give the toilet enough side space
- Make sure the shower has enough room to use safely
- Leave clear space in front of the toilet and sink
- Check that doors and cabinets can open without hitting other fixtures
The exact space can depend on your bathroom design, fixtures and local requirements. Marking these areas on your small bathroom plumbing diagram can help you find layout problems early.
Common Pipe Sizes for Small Bathrooms
Pipe sizes depend on the fixture and the plumbing system. Common sizes include:
- Toilet drain: 3-inch pipe
- Sink drain: 1½-inch pipe
- Shower drain: 2-inch pipe
- Water supply lines: ½-inch lines are common for many bathroom fixtures
Using the right pipe size helps your bathroom plumbing drain and supply water properly. Your plumber should confirm the pipe sizes needed for your specific layout before installation.
Check Your Plumbing Layout Before Work Starts
Before the plumbing work begins, check the location of the toilet, sink and shower. Make sure the drain pipes, water lines and vent connections match your final bathroom layout.
A clear small bathroom plumbing diagram with measurements can help prevent mistakes before the walls and floor are finished. It also gives your plumber a simple guide to follow during the rough-in work.
Small Bathroom Plumbing Diagram With Shower
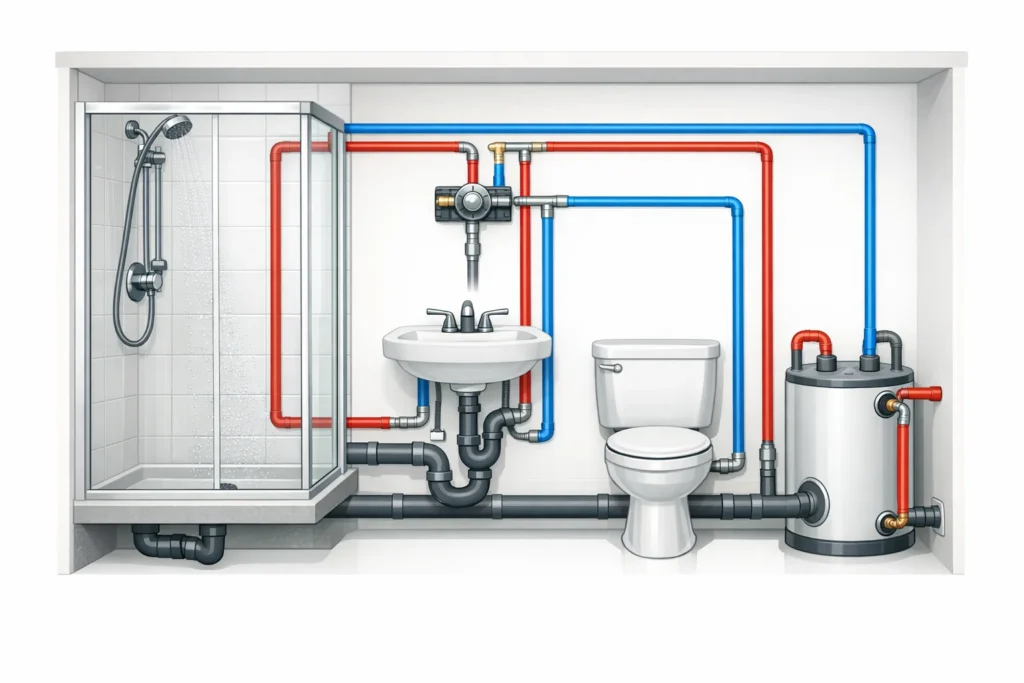
A small bathroom plumbing diagram with a shower helps you plan the toilet, sink and shower when there is no bathtub. This layout works well in many Toronto condos and GTA homes where space is limited. Replacing a tub with a shower can also give you more open floor space.
For a small 5×8 bathroom, the shower can sit at the end of the room or along the back wall. Keeping the shower close to the existing plumbing can also help reduce the amount of pipe work needed.
Simple 5×8 Bathroom Layout
A common small bathroom layout can include:
- Toilet: Place it based on the toilet model and the required rough-in space
- Vanity: Position it beside the toilet while leaving enough room to use both fixtures
- Shower: A 30 to 36-inch shower can work well in many small layouts, depending on the space and local requirements
Keeping the main fixtures close to the existing plumbing can make the work simpler. It may also help reduce the need to move drain pipes behind the walls or under the floor.
Shower Drain Placement
The shower drain needs to match the shower base or the tile layout. A small bathroom plumbing diagram with measurements should show the drain location before the shower is installed.
Common options include:
- Centre drain: Often used with square or standard shower bases
- Linear drain: Can be placed along one side of the shower
- Drain size: A 2-inch drain is commonly used for showers
- Drain slope: The floor and drain need the correct slope so water flows away properly
The exact drain location should follow the shower manufacturer’s instructions. A drain in the wrong spot can make installation harder and may cause drainage problems.
Shower Valve and Water Line Heights
The shower valve and water lines also need to be placed at the right height. The exact position can depend on the shower system you choose.
Common planning points include:
- Shower valve: Around 40 to 48 inches from the finished floor
- Shower head: Around 72 to 80 inches from the finished floor
- Water supply lines: Often ½ inch for many shower systems
Check the manufacturer’s instructions before the pipes are installed. This helps make sure the valve and shower head line up with your chosen fixtures.
Why a Shower Layout Can Work Well in a Condo
A shower-only bathroom can make good use of a small space. It can also be easier to plan when the new shower stays close to the existing drain and water lines.
This is especially useful in a Toronto condo, where moving plumbing may involve extra work or building approval. Keeping the new layout close to the existing plumbing can help limit pipe changes and keep the renovation simpler.
A clear small bathroom plumbing diagram also gives your plumber a better guide before the walls or floor are closed.
Common Small Bathroom Plumbing Diagram Mistakes to Avoid
A poorly planned small bathroom plumbing diagram can lead to leaks, drainage problems, and costly rework. In small Toronto condo and GTA bathrooms, even small errors can create big issues.
1. Wrong Rough-In Measurements
Placing the toilet, sink, or shower drain in the wrong spot is a common mistake. A proper small bathroom plumbing diagram with measurements must show exact distances before flooring and walls are finished.
2. Incorrect Drain Slope
Drain pipes must slope at least ¼ inch per foot toward the main waste line. Without proper slope, water will drain slowly or clog.
3. Poor Venting Layout
If the plumbing layout does not include proper vent connections, you may experience bad smells or gurgling drains. Every fixture must connect to the vent stack.
4. Overcrowded Fixture Spacing
Not leaving enough clearance around the toilet or shower can make the space uncomfortable and may fail inspection. Always follow minimum spacing guidelines in your small bathroom plumbing diagram.
Small Bathroom Plumbing Cost in Toronto & GTA
The cost can change a lot depending on how much of the existing plumbing you can keep. A bathroom that keeps the toilet, sink and shower in the same spots will usually need less work than one with a new layout.
| Plumbing Work | General Cost Range |
| Basic plumbing rough-in | $1,500 to $3,000 |
| Moving a toilet | $1,000 to $2,500+ |
| Moving a shower drain | $1,500 to $3,000+ |
| Major drain relocation | $4,000+ |
| Extra condo-related work | Depends on the building |
These prices are only rough planning ranges. Your final price can be different based on the condition of the old pipes, access behind the walls or floor, the distance to the main drain and how much plumbing needs to be moved.
For a Toronto condo, building rules can also affect the work and cost. Before starting, check what your building requires for plumbing changes and approvals.
A clear small bathroom plumbing diagram can help you plan the pipe locations before work begins. Keeping the new fixtures close to the existing plumbing can also help reduce extra work.
Basic Plumbing Rough-In (Same Layout)
If fixtures stay in the same location:
- $1,500 to $3,000 for basic rough-in work
- Includes connecting toilet, sink, and shower to existing lines
- Suitable for most small bathroom plumbing layouts in condos
This option is more affordable because the drain and supply lines remain close to the original stack.
Moving Plumbing Fixtures
If you change the layout shown in your small bathroom plumbing diagram:
- Moving a toilet: $1,000 to $2,500+
- Moving a shower drain: $1,500 to $3,000+
- Full drain relocation: Can exceed $4,000
Costs increase in condo buildings where concrete slab cutting or building approval is required.
Condo-Specific Costs in Toronto
For condo renovations, you may also need:
- Plumbing permits
- Condo board approval
- Licensed plumber documentation
These requirements can add several hundred dollars to the total cost.
What Affects the Final Price?
- Distance from the main waste stack
- Condition of existing pipes
- Type of pipe material used
- Accessibility behind walls or under floors
Keeping your fixtures close to existing plumbing lines in your small bathroom plumbing diagram is the most cost-effective approach.
Plan Your Small Bathroom Plumbing Layout With BathGuys
A good small bathroom plumbing diagram can make a big difference when space is tight. It helps you plan the toilet, sink, shower, drains and water lines before the work starts. Keeping the layout simple can also help reduce extra pipe work and avoid changes later.

At BathGuys, we help Toronto and GTA homeowners plan bathroom renovations around their space and existing plumbing. From small condo bathrooms to compact bathrooms in GTA homes, our team can help with the layout, renovation work and plumbing coordination.
Need help with your small bathroom plumbing layout? Contact us 📞+14168771879 today for a free consultation and get a clear plan for your bathroom renovation.
Frequently Asked Questions About Small Bathroom Plumbing Diagrams
-
What is the best plumbing layout for a small bathroom?
The best layout depends on the size of the room, the location of the existing pipes and the fixtures you want to use. In a small bathroom, keeping the toilet, sink and shower close to the existing plumbing can make the work easier. A small bathroom plumbing diagram can help you plan each fixture before work starts and make sure the layout fits the space.
-
How much space do you need for a small bathroom with a shower?
The space you need depends on the shower size, toilet, vanity and local requirements. A 5×8 bathroom can often fit a toilet, vanity and shower when the layout is planned carefully. The door swing and open space in front of each fixture also matter. Before choosing fixtures, check their actual sizes and place them on your small bathroom plumbing layout to make sure the room will not feel too tight.
-
Can I move plumbing in a Toronto condo bathroom?
Yes, plumbing can sometimes be moved, but condo work needs more planning. The location of the existing drain and plumbing stack can limit where you can place a new toilet, sink or shower. You may also need building approval and permits depending on the work. Toronto requires plumbing plans showing the layout of plumbing and related fixtures for many plumbing permit applications.
-
Do I need a permit to change bathroom plumbing in Toronto?
It depends on the type of work. Toronto states that new or altered plumbing systems generally require a building permit, while some smaller changes may not. Plumbing permit applications can also require drawings that show the plumbing and fixture layout. It is best to check the current City requirements before starting work, especially if you are moving drains or adding new plumbing.
-
When should a small bathroom plumbing diagram be made?
The diagram should be ready before the plumbing work starts. It gives you a chance to check the toilet, sink, shower, drains and water lines while changes are still easy to make. It is also useful when preparing permit drawings where required. Toronto’s inspection guidance says rough-in plumbing inspections take place when the water supply, drains, waste and vents are complete and ready for testing.