

A bathroom can look simple on the outside, but a lot is happening behind the walls. A small plumbing mistake can cause a big problem once the renovation is finished. Moving a drain, water line or vent later can mean more work, more time and a higher cost.
A bathroom rough-in plumbing diagram gives you a clear plan for the plumbing before the walls and floors are closed. It shows where the toilet, sink, shower, bathtub, drains, water lines and vents will go.
In this Richmond Hill guide, we cover common bathroom rough-in plumbing measurements, basement bathroom layouts, permit and inspection points, the rough-in process and the costs that can affect your renovation.
What Is a Bathroom Rough-In Plumbing Diagram?
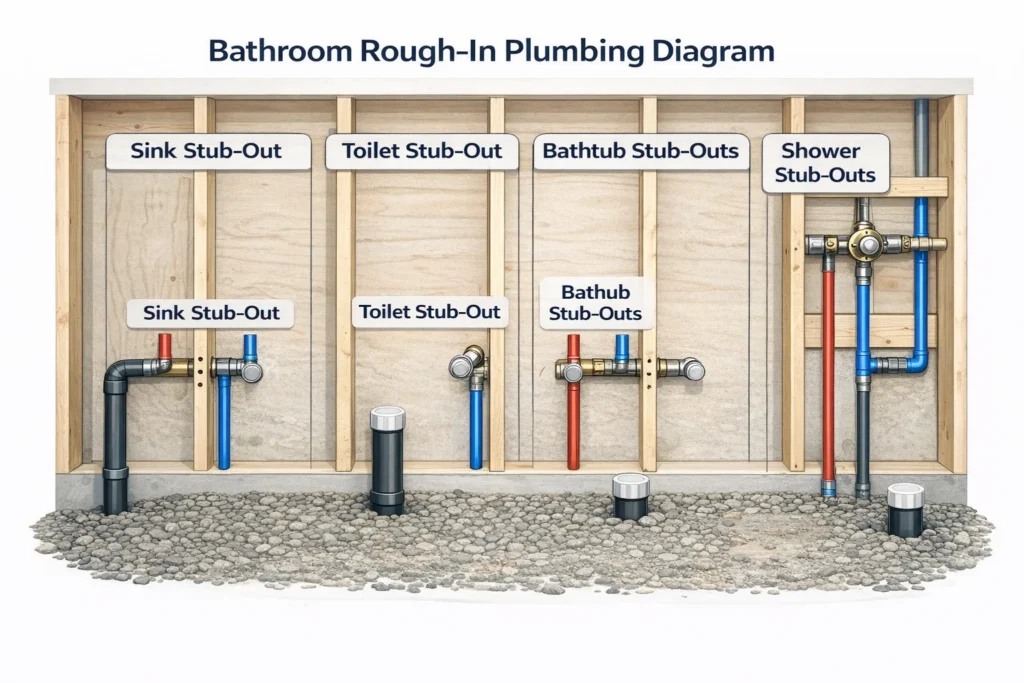
A bathroom rough in plumbing diagram is basically a blueprint of where your drain pipes , water supply lines , vent pipes & fixture connections are located before the walls & floors get finished . It’s the guide the plumbers use to get the job done right & make sure your bathroom passes inspection in Richmond Hill.
This diagram will include the toilet flange centre line , sink drain location , shower or tub drain placement , pipe sizes & vent connections . & if you’re lucky , a clear bathroom plumbing diagram for rough-in will show the required slope of drain pipes – usually ¼ inch per foot – so the wastewater flows smoothly.
What Is Included in a Rough Plumbing Diagram for Bathroom Renovations?
A standard rough plumbing diagram for bathroom projects will have:
- Where your toilet rough-in is in relation to the finished wall
- The height & water line spacing for the sink drain
- The shower or tub drain size & placement
- The vent stack connection
- The main drain line direction & slope
A standard 4 piece layout will get sorted out in the rough in plumbing diagram bathroom plan – just make sure the toilet , sink , bathtub & shower are spacier than they are connected to the drainage system.
Standard Bathroom Rough-In Plumbing Measurements
Getting the plumbing measurements right makes a bathroom renovation much easier. The toilet, sink, shower and bathtub all need to line up with the plumbing before the walls and floors are finished.
A bathroom rough-in plumbing diagram helps show where the drains, water lines and other connections should go. The exact measurements can change based on the fixture, bathroom layout and plumbing requirements for your home. Always check the fixture instructions before installing the pipes.
Toilet Rough-In Measurements
The toilet is usually one of the first fixtures to mark out. Its drain needs to line up with the finished wall and the toilet you plan to install.
Common toilet rough-in measurements include:
- Toilet rough-in: 12 inches is common from the finished wall to the centre of the toilet drain
- Side space: Keep at least 15 inches from the toilet centre to a side wall or other fixed object where required
- Front space: Leave enough open space in front of the toilet for comfortable use and access
A 12-inch rough-in is common in many Richmond Hill homes, but it is still important to check the toilet manufacturer’s specifications. Measure from the finished wall, not from the wall framing.
Sink Rough-In Plumbing Measurements
The sink drain and water lines should match the vanity and faucet you choose. The right height can vary depending on the type of sink and vanity.
Common planning measurements include:
- Sink drain: Often around 16 to 20 inches above the finished floor
- Water lines: Often around 20 to 22 inches above the finished floor
- Hot and cold lines: Position them to match the faucet and vanity
- Side space: Leave enough room around the sink for comfortable use
Your bathroom plumbing rough-in diagram should show the drain and water line locations. This helps make sure the P-trap and supply lines fit properly once the sink or vanity is installed.
Bathtub Rough-In Dimensions
Bathtub plumbing can vary because tubs come in different sizes and styles. The drain and water connections should be planned around the exact tub you are installing.
For a common bathtub setup:
- Drain size: 1½-inch drainage is commonly used
- Drain location: Follow the tub manufacturer’s instructions
- Faucet location: Place the valve and tub spout based on the tub design
- Overflow: Make sure the overflow and drain parts match the tub
Check the tub specifications before the plumbing work starts. This helps prevent drain or faucet connections from being in the wrong place.
Shower Rough-In Measurements
Shower plumbing needs careful planning because the drain, valve and shower head must work with the finished shower.
Common planning points include:
- Shower drain: Use the pipe size required for the shower and applicable plumbing rules
- Shower valve: Around 48 inches from the finished floor is a common starting point
- Shower head: Often around 72 to 80 inches from the finished floor
- Shower size: Make sure the finished shower meets the space requirements that apply to your project
The shower drain should also match the shower base or tile layout. Check the shower manufacturer’s instructions before setting the drain location.
Bathroom Drain Pipe Slope
Drain pipes need the right slope so wastewater can move toward the main drain. A common slope for smaller horizontal drain pipes is ¼ inch per foot, but the required slope can vary depending on pipe size and the plumbing rules that apply.
A good rough-in plumbing diagram for a bathroom should show the direction of the drain lines and where they connect to the main drainage system. Correct slope helps reduce slow drainage and standing water.
Check the Plumbing Layout Before Closing the Walls
Before the plumbing is covered, check the full layout one more time. Make sure the toilet drain, sink drain, shower drain, water lines and vent connections match the final bathroom design.
Checking these details while the pipes are still visible is much easier than fixing a problem after drywall, tile or fixtures have been installed. A clear bathroom plumbing rough-in plan can also help your plumber keep the installation on track.
Basement Bathroom Rough-In Plumbing Diagram
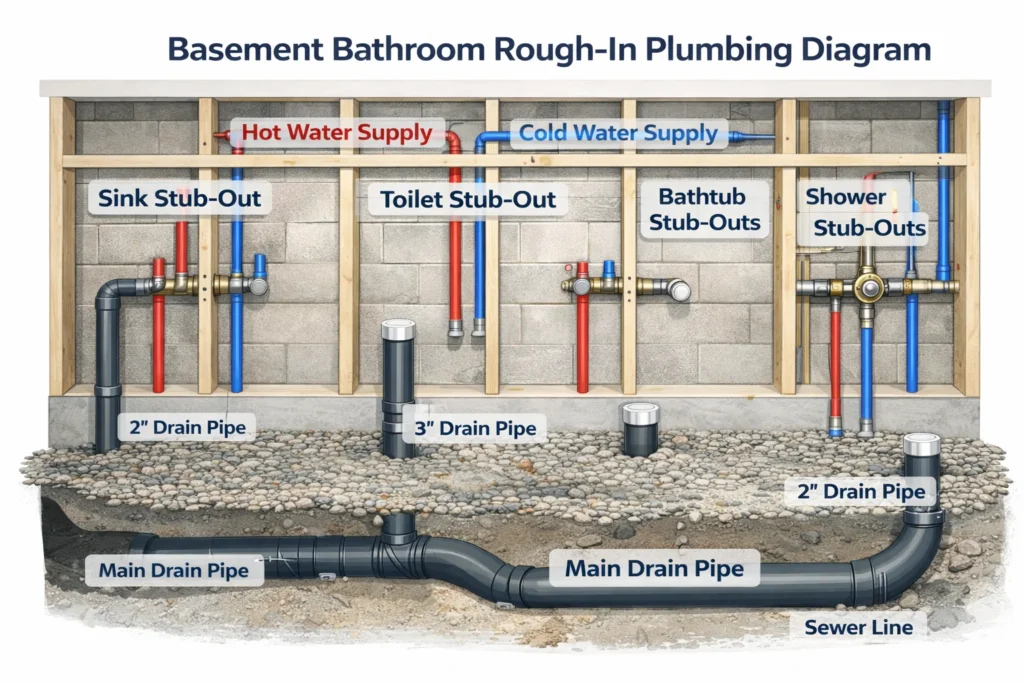
A basement bathroom rough in plumbing diagram is slightly different from a main-floor layout because the plumbing sits below ground level and connects to the home’s main sewer line under the concrete slab. In many Richmond Hill homes, especially newer builds, a basement rough-in is already installed by the builder. However, the pipe locations must still match your final bathroom layout.
A proper basement bathroom rough in plumbing diagram shows the toilet drain location, shower or tub drain, sink drain, vent connection, and the direction of the main sewer line. Since changes under concrete are costly, accurate measurements at this stage are critical.
What Is Included in a Basement Rough-In?
Most basement rough-ins include:
- A capped 3-inch or 4-inch toilet drain pipe
- A 2-inch shower drain pipe
- A 1½-inch or 2-inch sink drain
- A vent connection point
- Drain line slope toward the main stack
Your rough plumbing diagram for bathroom renovations should confirm these pipe sizes before framing begins.
Gravity Drain vs. Sewage Ejector Pump
In Richmond Hill homes, there are two common drainage setups:
1. Gravity Drain System: If the basement floor is higher than the city sewer line, waste flows naturally using proper pipe slope.
2. Sewage Ejector Pump System: If the basement is lower than the sewer line, a pump is required to move wastewater upward to the main drain.
Your rough in bathroom plumbing diagram must reflect the correct system. Installing fixtures without confirming this can lead to drainage failure.
Important Basement Rough-In Measurements
When reviewing a basement bathroom plumbing diagram for rough-in, check:
- Toilet rough-in distance: 12 inches from finished wall
- Minimum 15 inches from toilet centre to side wall
- Shower drain centred according to base size
- Drain pipe slope: ¼ inch per foot
Because basement plumbing is embedded in concrete, relocating pipes later can require cutting the slab, which increases cost and delays.
Richmond Hill Permit and Inspection Requirements for Bathroom Rough-In
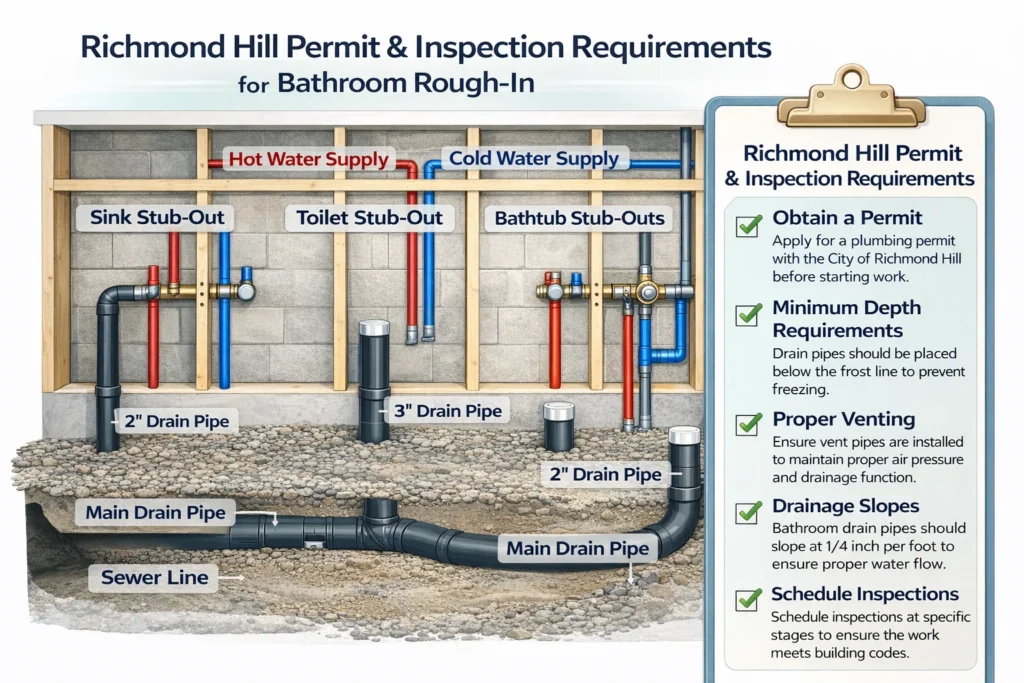
Adding a bathroom, finishing a basement bathroom, or moving existing plumbing can change the work that needs approval in Richmond Hill. Before the renovation starts, check with the City to see which permits and inspections apply to your project.
A bathroom rough-in plumbing diagram makes this stage easier to manage. It shows where the toilet, sink, shower or tub drains, water lines and vents will be placed. The actual plumbing should follow the approved plans and the requirements that apply to the renovation.
What Does the Rough-In Inspection Check?
The rough-in inspection is done while the plumbing is still easy to see. Pipes should not be covered with drywall, insulation or other finishes before the required inspection.
The inspection may check:
- Drain, waste and vent pipes
- Water supply lines and connections
- Pipe sizes and fittings
- Pipe support and placement
- Drainage and venting
- Fixture locations
- Plumbing work shown on the approved plans
Your bathroom plumbing rough-in diagram should match the plumbing installed on site. A change in the location of a toilet, sink or shower can affect the layout, so confirm any changes before the work continues.
Why Permits and Inspections Matter
Permits and inspections help make sure the plumbing work is done safely and follows the rules that apply to your home. They also provide a record of the work and can help prevent problems later.
A good bathroom rough-in plumbing diagram also reduces mistakes during installation. It gives the plumber a clear layout for the drain pipes, water lines and venting before the walls and floors are finished.
For basement bathrooms and major plumbing changes, checking the permit requirements early can help avoid delays, rework and extra costs. Once the rough-in is complete and the required inspection has been handled, the next stages of the renovation can move forward with fewer surprises.
Step-by-Step Bathroom Rough-In Plumbing Process
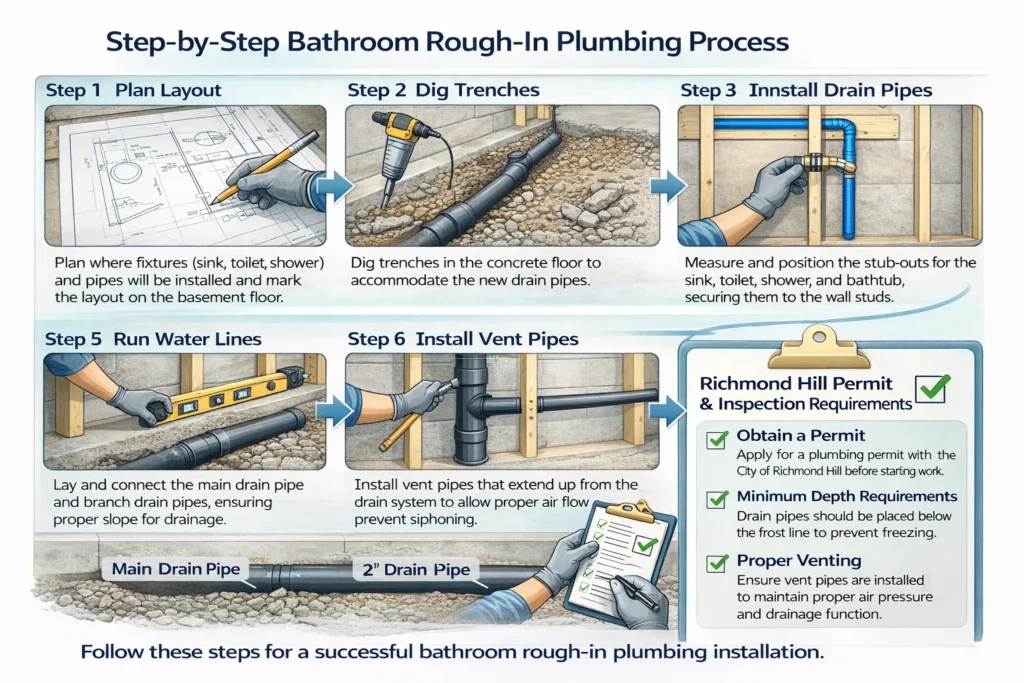
A bathroom rough-in plumbing diagram helps you place every pipe in the right location before the walls and floors are finished. Whether you are doing the work yourself or hiring a bathroom plumbing service, following the right steps can help avoid mistakes, save time and keep your renovation on track.
1. Plan the Bathroom Layout
Start by deciding where the toilet, sink, shower and bathtub will go. Mark the centre point for each fixture and compare it with your bathroom rough-in plumbing diagram.
Check all measurements before any cutting or plumbing work begins. Good planning helps your plumbing service complete the installation with fewer changes later.
2. Mark the Plumbing Locations
Mark the locations for the toilet drain, sink drain, shower drain and water supply lines.
Your bathroom plumbing rough-in diagram should match these locations. Taking a little extra time to check the measurements now can help everything fit properly after installation.
3. Install the Drain Pipes
Install the main drain pipe first, then connect the drain pipes for each fixture.
Common drain pipe sizes include:
- Toilet: 3-inch or 4-inch drain pipe
- Shower: 2-inch drain pipe
- Sink: 1½-inch or 2-inch drain pipe
The drain pipes should also have the correct slope so wastewater can flow smoothly to the main drain. A professional plumbing service will also check that the pipe connections are installed correctly.
4. Install the Vent Pipes
Install the vent pipes after the drain pipes are in place. These pipes help air move through the plumbing system and support proper drainage.
A rough-in plumbing diagram for a bathroom should clearly show the vent pipe locations. Good venting helps the plumbing system work the way it should.
5. Install the Water Supply Lines
Run the hot and cold water lines to the toilet, sink and shower. Secure each pipe and place it in the correct location before moving to the next step.
A clear bathroom rough-in plumbing diagram helps your plumbing service install the water lines in the right position.
6. Test the Plumbing System
Before the walls are covered, test the plumbing system. Check for leaks in the water lines and make sure all drain connections are secure.
Fixing small problems now can save both time and money later in the renovation.
7. Complete the Rough-In Inspection
Once the plumbing work is finished, book the required rough-in inspection before drywall or other finishes are installed.
The plumbing should match the approved plans and your bathroom rough-in plumbing diagram. A trusted plumbing service can also help make sure everything is ready before the inspection takes place.
Cost of Bathroom Rough-In Plumbing in Richmond Hill (2026 Estimate)
The cost of installing plumbing based on a bathroom rough in plumbing diagram depends on whether you are adding a new bathroom, finishing a basement, or relocating existing fixtures. In Richmond Hill, labour rates and permit requirements also affect the final price.
Below are general 2026 estimates for rough-in plumbing only, not including fixtures, tiles, or finishing work.
Average Rough-In Plumbing Cost
- New 4-piece bathroom rough-in: $2,500 to $5,000
- Basement bathroom rough-in (existing pipes): $2,000 to $4,000
- Basement bathroom with concrete cutting: $3,500 to $7,000
- Relocating toilet or main drain line: $1,000 to $3,000 extra
These costs include installing drain pipes, venting, and water supply lines according to a rough plumbing diagram for bathroom layouts.
What Affects the Cost?
Several factors influence the total price:
1. Pipe Relocation: Moving a toilet or shower from its original location requires modifying the drain system shown in your bathroom plumbing diagram for rough-in.
2. Concrete Slab Cutting: Basement projects often require cutting and re-pouring concrete to adjust drain placement.
3. Venting Modifications: Adding new vent connections or extending existing stacks increases labour.
4. Permit and Inspection Fees: Richmond Hill building permits and inspections add to overall project costs.
5. Ejector Pump Installation: If a sewage ejector pump is required, this can add $1,500 to $3,000 to the total cost.
How to Control Rough-In Costs
To avoid unexpected expenses:
- Finalize the bathroom layout before plumbing begins
- Follow an accurate rough in bathroom plumbing diagram
- Avoid moving major fixtures after installation
- Confirm drainage system type in basement projects
A properly planned bathroom rough plumbing diagram reduces rework, inspection delays, and unnecessary labour costs.
DIY vs Hiring a Licensed Bathroom Renovation Contractor in Richmond Hill

Working from a bathroom rough in plumbing diagram requires accurate measurements, correct pipe sizing, proper venting, and compliance with Ontario plumbing code. If the rough-in stage is done incorrectly, it can lead to failed inspections, drainage issues, and expensive rework.
Here is a direct comparison to help you decide.
DIY Bathroom Rough-In Plumbing
DIY may seem cost-effective, but you must ensure:
- Toilet rough-in is exactly 12 inches from the finished wall
- Drain pipes slope ¼ inch per foot
- Shower drain is 2 inches minimum
- Venting is properly connected to the main stack
- Pipe sizes match code requirements
If your rough plumbing diagram for bathroom installation does not meet inspection standards, approval will not be granted. Corrections often require opening floors or walls again.
Hiring a Licensed Contractor in Richmond Hill
A licensed contractor ensures:
- The bathroom plumbing diagram for rough-in follows Ontario regulations
- Pipe sizes and venting are installed correctly
- Rough-in inspection passes without delays
- Basement rough-ins connect properly to the main drain
For new bathrooms, basement additions, or fixture relocation, hiring a professional affordable bathroom renovation in richmond hill reduces risk and protects your investment.
Plan Your Bathroom Rough-In Plumbing With BathGuys
A good bathroom rough-in plumbing diagram gives your renovation a clear starting point. It shows where the toilet, sink, shower, bathtub, drains and water lines should go before the walls and floors are finished. Getting the plumbing layout right from the start can help you avoid changes, delays and extra costs later.

At BathGuys, we help homeowners plan their bathroom renovations with careful attention to the plumbing layout. From a basement bathroom rough-in to a complete bathroom remodel, our team can help coordinate the work and make sure each part of the renovation is planned properly.
Need help with your bathroom plumbing layout? Call BathGuys at 📞+14168771879 to book a free consultation and take the next step toward your bathroom renovation.
FAQs About Bathroom Rough-In Plumbing Diagrams
-
Why is a bathroom rough-in plumbing diagram important?
A bathroom rough-in plumbing diagram gives you a clear plan before the plumbing work starts. It shows where the toilet, sink, shower, bathtub, drain pipes and water lines should go. This helps your plumber place everything in the right spot before the walls and floors are finished. A good layout can also help avoid mistakes, reduce extra work and make the whole bathroom renovation easier from start to finish.
-
Can I change my bathroom layout after the rough-in plumbing is finished?
Yes, you can, but it is usually not a good idea. Changing the layout after the rough-in plumbing is complete may mean moving drain pipes, water lines and vent pipes. This can increase the cost and add more time to your renovation. It is always better to finalise your bathroom layout and bathroom rough-in plumbing diagram before the plumbing work begins.
-
How long does bathroom rough-in plumbing usually take?
The time depends on the size of the bathroom and the amount of plumbing work needed. A simple bathroom rough-in may take one to two days, while a larger bathroom or basement project can take longer. If pipes need to be moved or new plumbing has to be added, the work may take extra time. A clear plan and a professional plumbing service can help keep the project on schedule.
-
What happens if the bathroom rough-in plumbing measurements are wrong?
Wrong measurements can cause many problems later. The toilet, sink, shower or bathtub may not fit where they should, and the plumbing may need to be changed before the renovation can continue. Fixing these mistakes after the walls or floors are finished can be expensive. Checking your bathroom rough-in plumbing diagram carefully before the work starts can help prevent these problems.
-
Should I hire a professional plumbing service for bathroom rough-in work?
Hiring a professional plumbing service is a smart choice for most bathroom renovations. An experienced plumber knows how to place the drain pipes, water lines and vent pipes correctly. They can also check that everything matches your bathroom rough-in plumbing diagram before the walls are closed. This helps reduce mistakes, saves time and gives you more confidence that the plumbing has been installed properly.