

Planning a bathroom renovation – but getting bogged down by those pipes and drain lines? Many Toronto homeowners dive into the project without a clear bathroom plumbing diagram and that can lead to some seriously costly mistakes, failed inspections or plumbing that just plain doesn’t work right. Whether you’re finishing a basement, upgrading a condo or building a new bathroom, whats going on behind the walls is just as important as the tiles and fixtures you choose to see.
In this guide we’ll break down what a bathroom plumbing diagram is, how typical layouts play out in Toronto and GTA homes, rough-in measurements, and the important Ontario plumbing rules you need to know.
What Is a Bathroom Plumbing Diagram and Why Does It Matter?
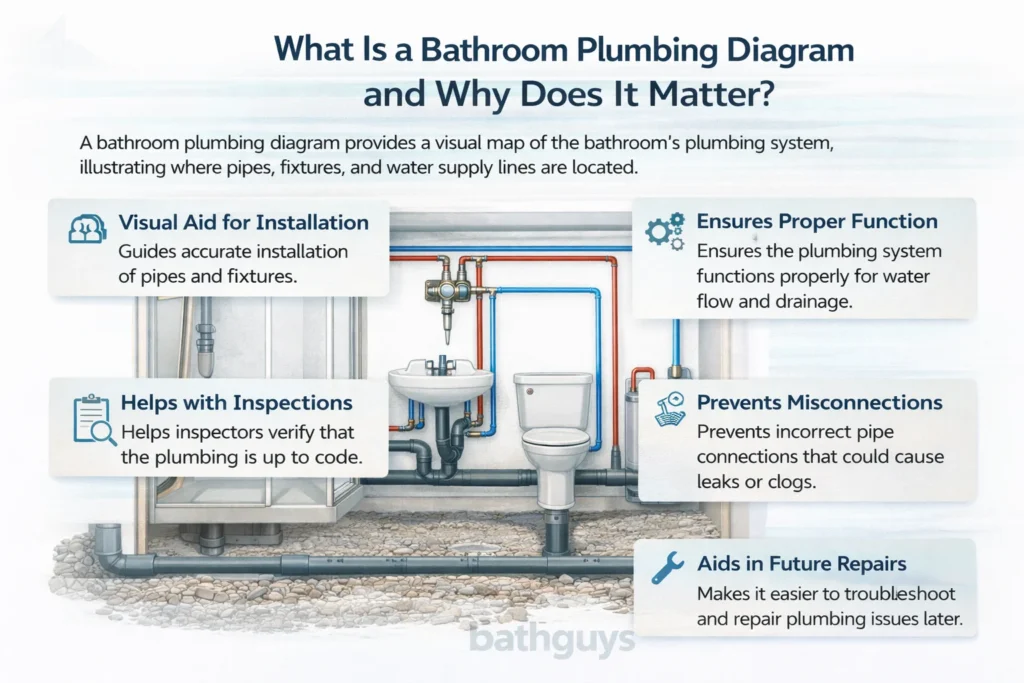
A bathroom plumbing diagram is just a simple drawing that shows how your toilet, sink and shower connect to water supply lines, drain pipes and vent pipes. Its a visual that explains where the pipes run inside the walls and under the floor. This kinda plumbing diagram is super useful for planning and rough-in work – before you get to the tiles and drywall.
For homeowners in Toronto and the GTA, this diagram is pretty important because it helps keep the layout working properly and in line with Ontario plumbing regulations. A correct bathroom plumbing diagram is all about getting the right drain slope, vent placement & fixture spacing. Without one, you might be looking at drainage issues, delayed inspections or costly changes down the line. To put it simply – it acts as a blueprint that keeps your bathroom renovation safe, efficient and code-compliant.
How Bathroom Plumbing Actually Works (Explained Simply)
Bathroom plumbing works through three main systems: water supply, drainage, and venting. A clear bathroom plumbing diagram shows how these three parts connect and work together behind the walls.
1. Water Supply Lines
Clean water enters your home through the main water line. From there, smaller pipes carry hot and cold water to each fixture such as the sink, toilet, and shower. In a plumbing diagram bathroom layout, these supply lines are usually shown in separate colours to avoid confusion. The toilet connects only to cold water, while sinks and showers connect to both hot and cold lines.
2. Drainage System
After you use the sink, toilet, or shower, wastewater flows into drain pipes. These pipes are installed at a slight angle so gravity can move waste toward the main sewer line. A typical bathroom plumbing diagram shows larger drain pipes for toilets and slightly smaller ones for sinks and tubs. Each fixture also has a P-trap, which holds a small amount of water to block sewer gases from coming back into the bathroom.
3. Vent Pipes
Vent pipes allow air into the plumbing system. This keeps water flowing smoothly and prevents gurgling sounds or slow drains. In a simple bathroom plumbing diagram, the vent pipe usually runs upward and connects to a vent stack that exits through the roof.
When these three systems are planned correctly in a bathroom plumbing diagram, your bathroom runs quietly, drains properly, and meets building code standards in Toronto and the GTA.
Standard Bathroom Plumbing Layouts Used in Toronto Homes

In most Toronto homes, a bathroom plumbing diagram is designed to keep fixtures close to the main drain stack. This improves drainage, reduces pipe length, and helps meet Ontario plumbing code requirements. The layout you choose affects cost, inspection approval, and how smoothly your bathroom functions.
Below are the most common bathroom plumbing layouts used in the GTA.
1. Single-Wall Layout
This is the most common layout in small and mid-size homes. The toilet, sink, and shower or tub are installed along one wall. In a typical bathroom plumbing diagram, all fixtures connect to a single branch drain that ties into the main stack.
Best for:
- Main floor bathrooms
- Renovations without moving major plumbing
- Cost-effective upgrades
2. Back-to-Back Layout
In this layout, two bathrooms share one plumbing wall. The drain and vent stack serve both rooms. A plumbing diagram for bathroom projects using this setup keeps pipe runs short and efficient.
Best for:
- Two-storey homes
- Homes with an ensuite and main bath side by side
- Reducing plumbing material and labour costs
3. Basement Bathroom Layout
Basement bathrooms require careful planning because drains are below ground level. A proper bathroom plumbing diagram must show correct slope and connection to the main sewer line. In some cases, a pump system is needed if gravity drainage is not possible.
Best for:
- New basement additions
- Converting unfinished space into living areas
In Toronto and GTA homes, the best bathroom plumbing layout keeps fixtures grouped together, ensures proper venting, and connects directly to the main drain stack. A clear and accurate bathroom plumbing diagram helps avoid drainage problems and supports smooth inspection approval.
Bathroom Rough-In Measurements & Ontario Plumbing Code Guidelines
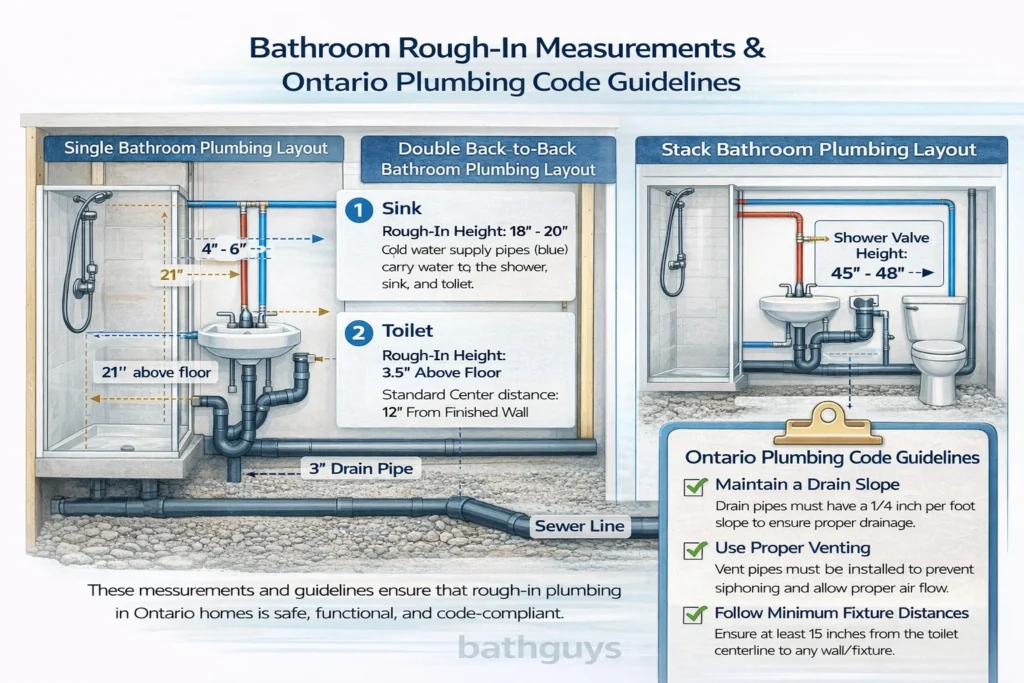
Before drywall and tiles are installed, plumbers complete the “rough-in.” This is when drain pipes, water supply lines, and vents are positioned according to the bathroom plumbing diagram. Correct rough-in measurements are critical because once the walls are closed, changes become expensive and difficult.
Below are standard rough-in measurements commonly used in Toronto and GTA homes.
Standard Toilet Rough-In
- 12 inches from the finished wall to the centre of the toilet drain
- Drain pipe size: typically 3 inches
- Minimum spacing: at least 15 inches from the centre of the toilet to any side wall or fixture
This measurement must match the plumbing diagram for bathroom installations to avoid fixture misalignment.
Sink (Vanity) Rough-In
- Drain height: usually 16–20 inches from the floor
- Water supply lines: about 2–3 inches above the drain pipe
- Drain pipe size: typically 1.5 inches
A simple bathroom plumbing diagram will show the sink drain connected to a vented branch line to ensure smooth drainage.
Shower or Tub Rough-In
- Shower drain pipe size: usually 2 inches
- Proper floor slope toward the drain
- Waterproofing and trap placement must meet Ontario standards
The bathroom water plumbing diagram should clearly show the trap location and vent connection to prevent sewer gas issues.
Key Ontario Plumbing Code Guidelines
In Toronto and across Ontario, plumbing must follow the Ontario Building Code. While detailed technical rules are handled by licensed professionals, homeowners should be aware of these basics:
- Drain pipes must be installed with proper slope to allow gravity flow
- Every fixture must be vented
- Minimum pipe sizes must match fixture type
- Changes to plumbing usually require a permit and inspection
A properly designed bathroom plumbing diagram ensures all rough-in measurements align with code requirements before installation begins.
Basement Bathroom Plumbing in GTA Homes: What’s Different?
Basement bathroom plumbing is a whole different story compared to the main floors because the location is literally below the surface. In a typical, standard bathroom plumbing layout, things rely on gravity to get waste from the toilet, sink and shower down to the main sewer line. Trouble is, in many GTA basements, the sewer line ends up being higher than the bathroom fixtures – big problem.
Here are the key differences homeowners should know.
1. Drain Depth and Slope
Basement drain pipes must connect to the home’s main sewer line with proper slope. If the existing drain is too high, gravity alone will not work. A basement plumbing diagram for bathroom projects must clearly show how waste will flow before concrete is cut.
2. Sewage Ejector or Pump Systems
If gravity drainage is not possible, a sewage ejector pump may be required. This system collects wastewater from the toilet, sink, and shower, then pumps it up to the main sewer line. A proper bathroom plumbing diagram will show the pump basin location and discharge pipe route.
3. Concrete Slab Cutting
Unlike upper floors, basement rough-in requires cutting into the concrete slab to install drain lines. The plumbing diagram for bathroom renovations must be finalized before this step to avoid rework and added costs.
4. Venting and Code Compliance
Basement fixtures still require proper venting under Ontario plumbing rules. The vent pipe must connect to the main vent stack or use an approved venting method. Incorrect venting can lead to slow drains and inspection issues.
Condo & Apartment Bathroom Plumbing Layouts in Toronto
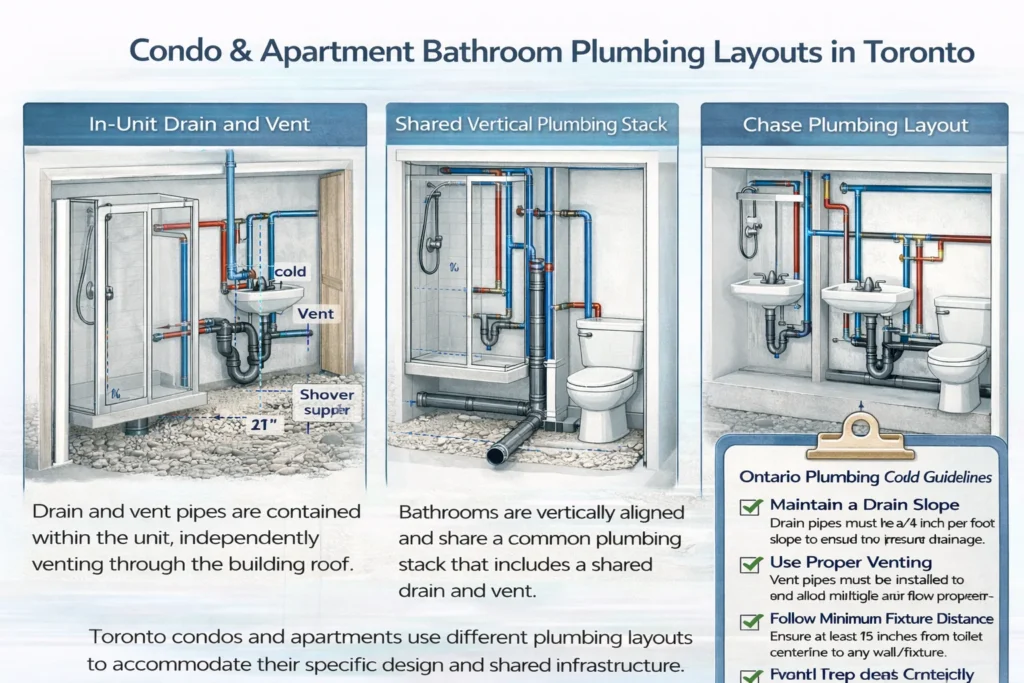
Bathroom plumbing in Toronto condos and apartments is a whole different story compared to houses because you’ve got to share the same vertical drain and vent stack with the other units. So for a bathroom plumbing layout in a condo renovation, it’s a good idea to keep fixtures close to the existing plumbing connections.
Here are the key points that matter most.
Limited Layout Changes
In most condo bathrooms, the toilet, sink, and shower are pretty much right next to the main stack. If you start moving them around, you can affect the drainage slope and might end up with a problem that’s not going to get past the building inspectors. A plumbing diagram for condo bathroom renovations usually sticks to the same fixture positions to avoid having to move all the pipes around.
Shared Drain Stack System
Unlike a house bathroom plumbing layout, condos use a shared plumbing system that connects to multiple units. Your bathroom plumbing layout has to show proper connection to the existing drain and vent stack without causing any problems with the building’s structure.
Approval and Code Compliance
If you do end up changing any drain lines, you’ll likely need to get building approval and city permits in Toronto. A good updated bathroom plumbing layout will make sure the renovation follows the Ontario plumbing code and you’ll pass inspection with flying colours.
Types of Bathroom Plumbing Diagrams (Basic, Full, Commercial & More)
The type of bathroom plumbing diagram depends on the size of the bathroom, number of fixtures, and building type. Below are the main types homeowners in Toronto and the GTA should know.
1. Basic Bathroom Plumbing Diagram
A basic bathroom plumbing diagram is used for small bathrooms with three fixtures:
- Toilet
- Sink
- Shower or tub
All fixtures connect to one branch drain that ties into the main stack. This layout is common in powder rooms and standard main-floor bathrooms.
2. Full Bathroom Plumbing Diagram
A full bathroom plumbing diagram includes four fixtures:
- Toilet
- Sink or double vanity
- Bathtub
- Separate shower (if space allows)
This layout requires proper venting and larger drain connections. It is commonly used in master bathrooms.
3. Basement Bathroom Plumbing Diagram
This type of plumbing diagram for bathroom projects is designed for below-grade installations. It must show correct drain slope and connection to the main sewer line. In some GTA homes, a pump system is included if gravity drainage is not possible.
4. Commercial Bathroom Plumbing Diagram
A commercial bathroom plumbing diagram is used in offices and public buildings. It often includes multiple toilets and sinks connected to larger drain pipes designed for heavy use.
5. Condo or Apartment Bathroom Plumbing Diagram
In condos, the bathroom plumbing diagram connects fixtures to a shared vertical stack. Layout changes are limited, and fixtures usually stay close to the original plumbing lines.
How to Read a Bathroom Plumbing Diagram Step by Step
If you are looking at a bathroom plumbing diagram for the first time, it may seem confusing. However, most plumbing diagrams for bathroom layouts follow a simple structure. Follow these steps to read it clearly and correctly.
Step 1: Identify the Fixtures
Start by locating the main fixtures:
- Toilet
- Sink
- Shower or tub
These are usually shown with simple symbols. The diagram shows how each fixture connects to water supply lines and drain pipes.
Step 2: Locate the Main Drain Line
Next, find the main drain or soil stack. In a typical bathroom plumbing diagram, all fixture drains connect to this vertical pipe. The toilet usually connects directly with a larger drain pipe, while sinks and showers connect through smaller branch lines.
Step 3: Check the Drain Slope Direction
Drain pipes must slope slightly downward toward the main sewer line. A good plumbing diagram bathroom layout will show the direction of flow. This ensures wastewater moves properly using gravity.
Step 4: Find the Vent Pipes
Every fixture must be vented. Look for vertical vent lines that connect to the main vent stack. Proper venting prevents slow drainage and sewer gas problems.
Step 5: Review Water Supply Lines
Hot and cold water lines are shown separately in a bathroom water plumbing diagram. Sinks and showers connect to both, while toilets connect only to cold water.
Step 6: Confirm Rough-In Positions
Check the rough-in locations for the toilet, sink, and shower. The bathroom plumbing diagram should clearly show spacing and pipe placement before walls are closed.
Should You DIY or Hire a Bathroom Renovation Expert?
When you’re looking over a small bathroom plumbing diagram, chances are you’re not just looking to make a few simple tweaks you’re planning a full-on renovation. And while that might mean taking on a small job like swapping out a faucet or installing a new toilet in the same spot that’s a job that can often be done without much fuss.
But when you’re talking about moving fixtures around, or taking a sledgehammer to the plumbing layout, or turning a basement into a bathroom, or trying to update a condo bathroom in Toronto – that’s a whole different story. Because at that point, you need to make sure your plumbing follows the rules: proper slope, proper venting, and all the Ontario code requirements. And let me tell you, if you get that part wrong, you’ll be dealing with leaks, drainage issues, or failed inspections that’ll make your head spin.
If your renovation is pretty straightforward, then DIY might be the way to go. But if you’re dealing with layout changes or rough-in adjustments, it’s probably best to bring in a bathroom renovation expert who knows what they’re doing. That way, you can avoid costly problems down the line and be sure everything gets installed right the first time.
FAQs About Bathroom Plumbing Diagrams
-
What’s a Typical Bathroom Plumbing Diagram Look Like?
A bathroom plumbing diagram is just what it sounds like: a map of how the toilet, sink, and shower all hook up to the main water supply lines, drain pipes, and vent stacks. It shows pipe sizes, slope direction and fixture placement – all to make sure you get good drainage and don’t run afoul of the building code.
-
What’s the Standard Toilet Rough-In Size in Canada?
In most Toronto and GTA homes, the standard toilet rough-in size is 12 inches from the finished wall to the centre of the drain pipe. And that needs to match the bathroom plumbing diagram before you even think about installing the thing.
-
Do I Need a Permit to Change Bathroom Plumbing in Toronto?
If you’re moving fixtures around, modifying drain lines, or messing with the venting – Yep, you’ll probably need a permit. And that updated plumbing diagram for bathroom renovations has got to meet Ontario Building Code standards and pass inspection.
-
How Much Does it Cost to Rough-In Plumbing for a New Bathroom in Toronto?
Let’s just say that bathroom plumbing rough-in costs in Toronto depend on a whole lot of factors – how complicated your layout is, where you’re putting all the fixtures, whether you’re doing a basement or not. And if you need to move drains or cut through a slab – forget about it. That’ll add a bunch to your overall cost.
-
Can I Install Bathroom Plumbing Myself in Ontario?
Technically, sure – homeowners can handle some minor plumbing work. But if you’re messing with the main plumbing diagram – you’d do best to follow the rules. And if you’re looking at making layout changes or installing new plumbing – it’s usually best to leave that to a licensed pro. That way, you can avoid all sorts of inspection issues and costly repairs down the line.