
Planning a bathroom on the second floor can feel confusing, especially when pipes run through walls, ceilings, and floors. Many GTA homeowners worry about leaks, drainage problems, or failing inspections because they do not clearly see how everything connects. That is where a proper 2nd floor bathroom plumbing diagram becomes important.
In this guide, we will break down a clear and simple view of how an upstairs bathroom plumbing system works. You will learn about water supply lines, drain and vent pipes, rough-in measurements, layout examples, and GTA plumbing code basics.
What Is a 2nd Floor Bathroom Plumbing Diagram?

A 2nd floor bathroom plumbing diagram is a simple drawing that shows how pipes are arranged in an upstairs bathroom. It explains how hot and cold water reach the sink, toilet, and shower, and how wastewater flows down through drain pipes to the main sewer line. This type of diagram is important when planning a renovation or new bathroom on the upper level of a home.
A typical second floor bathroom plumbing diagram includes:
- Water supply lines (hot and cold)
- Drain pipes connected to each fixture
- Vent pipes that balance air pressure
- A vertical stack that carries waste to the lower floor
Because the bathroom is located above the main level, the layout must show proper pipe slope and correct vent placement. A clear upstairs bathroom plumbing diagram helps prevent drainage issues, pipe conflicts, and layout errors before construction begins. It works as a planning guide to ensure the plumbing system is safe, efficient, and built correctly.
How a Second Floor Bathroom Plumbing System Works
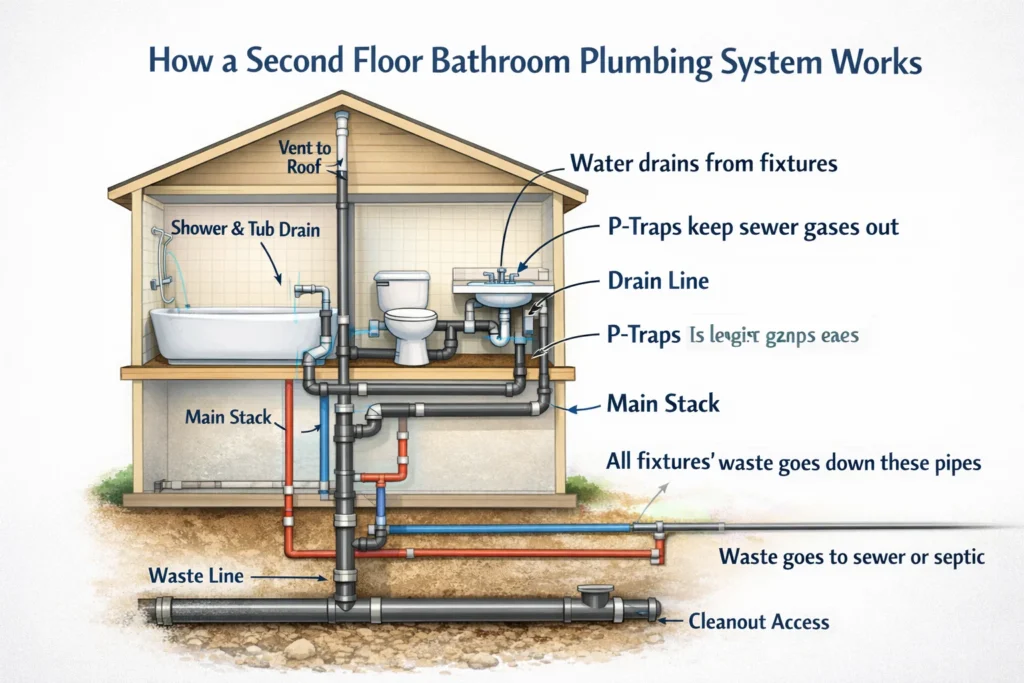
A second floor bathroom plumbing system works by bringing clean water up and sending wastewater down through a vertical pipe layout. A clear 2nd floor bathroom plumbing diagram shows how supply lines, drain pipes, and vent pipes connect to the main stack below.
Water Supply Lines
Water travels from the main line to the upper floor through vertical pipes. Separate lines carry hot and cold water to the sink, toilet, and shower. The diagram shows how these lines branch to each fixture without crossing or interfering with drain pipes.
Drain Pipes and Slope
After use, wastewater flows into drain pipes. In a proper second floor bathroom plumbing diagram, each fixture connects to a sloped drain line that directs water toward the main soil stack. The slope is important because gravity moves the waste downward to the lower floor and then to the sewer line.
Vent Pipes and Airflow
Vent pipes connect to the drain system and extend upward. Their role is to balance air pressure inside the pipes. In an upstairs bathroom plumbing diagram, vents prevent slow drainage and stop sewer gases from entering the bathroom.
Standard Rough-In Measurements for 2nd Floor Bathrooms
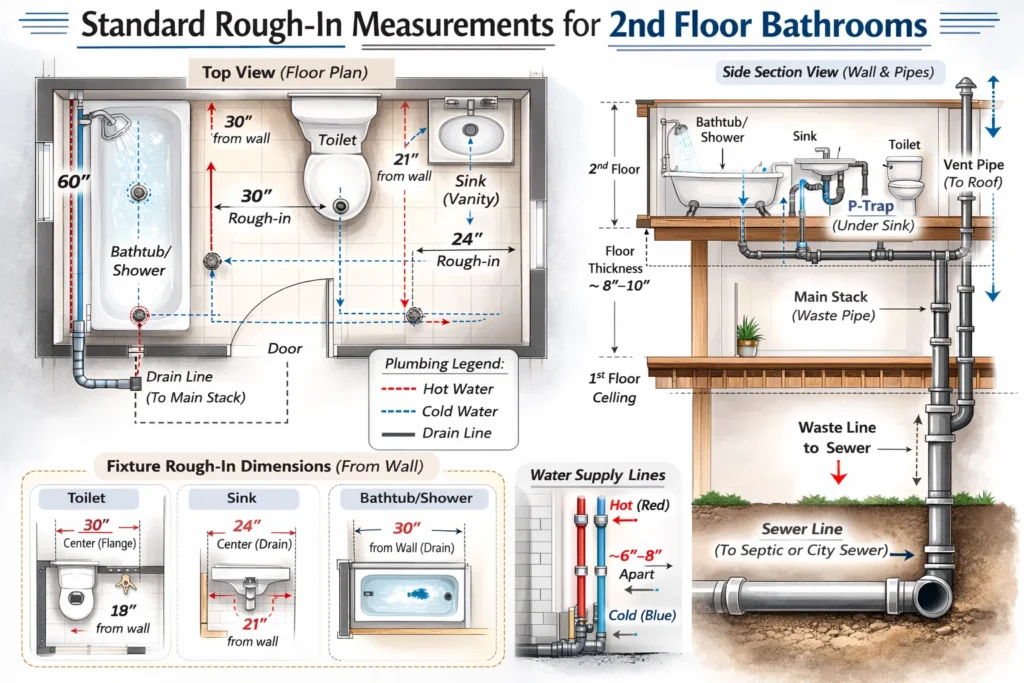
Rough-in measurements are the fixed pipe locations installed before walls and floors are finished. A proper 2nd floor bathroom plumbing diagram must show these measurements clearly to avoid fixture misalignment and costly rework. Accurate rough-ins are especially important in upstairs renovations where changing pipes later is more difficult.
Below are the standard rough-in dimensions used in most Canadian homes.
Toilet Rough-In
- 12 inches from the finished wall to the centre of the drain pipe (most common size)
- Minimum 15 inches from the toilet centre to any side wall or fixture
- At least 24 inches clear space in front of the toilet
These measurements ensure the toilet fits properly and meets spacing requirements shown in a second floor bathroom plumbing diagram.
Sink Rough-In
- Drain pipe centre typically 16–20 inches above the finished floor
- Hot and cold water supply lines about 2–3 inches above the drain pipe
- At least 4 inches between supply lines
Correct sink rough-ins prevent cabinet and vanity conflicts in an upstairs bathroom plumbing diagram.
Shower and Tub Rough-In
- Shower drain usually centred in the shower base
- Standard drain size: 2 inches in diameter
- Shower head height commonly 72–80 inches above the floor
- Tub drain placed according to manufacturer specifications
A properly sized 2-inch drain is important for second floor drainage to handle water flow efficiently.
Why Rough-In Accuracy Matters on the Second Floor
On upper levels, pipes run through joists and ceilings. If rough-in locations are incorrect, adjustments can weaken framing or require opening finished ceilings below. A detailed 2nd floor bathroom plumbing diagram helps confirm measurements before installation begins.
2nd Floor Bathroom Plumbing Diagram (Step-by-Step Layout Example)
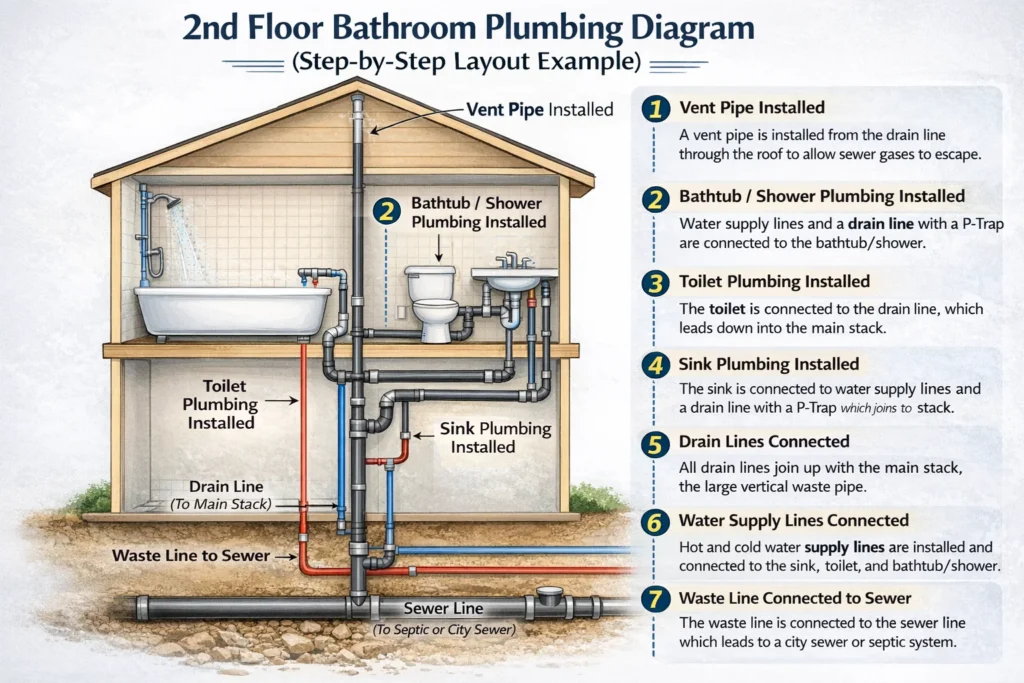
A clear 2nd floor bathroom plumbing diagram shows the exact path of supply pipes, drain lines, and vents before installation begins. Below is a simple step-by-step layout example to explain how a typical upstairs bathroom plumbing system is arranged in GTA homes.
Step 1: Mark Fixture Locations
Start by placing the toilet, sink, and shower or tub on the floor plan. The position of each fixture determines where the drain and water lines will run. In most cases, fixtures are aligned near an existing wall that contains the main plumbing stack.
Step 2: Connect to the Main Soil Stack
The toilet drain connects directly to a vertical soil stack inside the wall. In a proper second floor bathroom plumbing diagram, the sink and shower drains tie into this line through a sloped horizontal branch. This ensures wastewater flows downward by gravity to the lower level.
Step 3: Add Proper Drain Slope
All horizontal drain pipes must slope slightly toward the main stack. The diagram should clearly show this angle so water flows smoothly without pooling. Proper slope is critical in an upstairs bathroom plumbing diagram because gravity is the only force moving waste downward.
Step 4: Install Vent Connections
Each drain line must connect to a vent pipe that extends upward. The vent balances air pressure and prevents slow draining. In many layouts, the sink drain also acts as a wet vent for the toilet, depending on local plumbing code.
Step 5: Route Hot and Cold Water Lines
Water supply lines run upward from the lower floor and branch to each fixture. The diagram shows separate lines for hot and cold water, placed away from drain pipes to avoid interference during framing.
Common Plumbing Mistakes in Upstairs Bathroom Installations
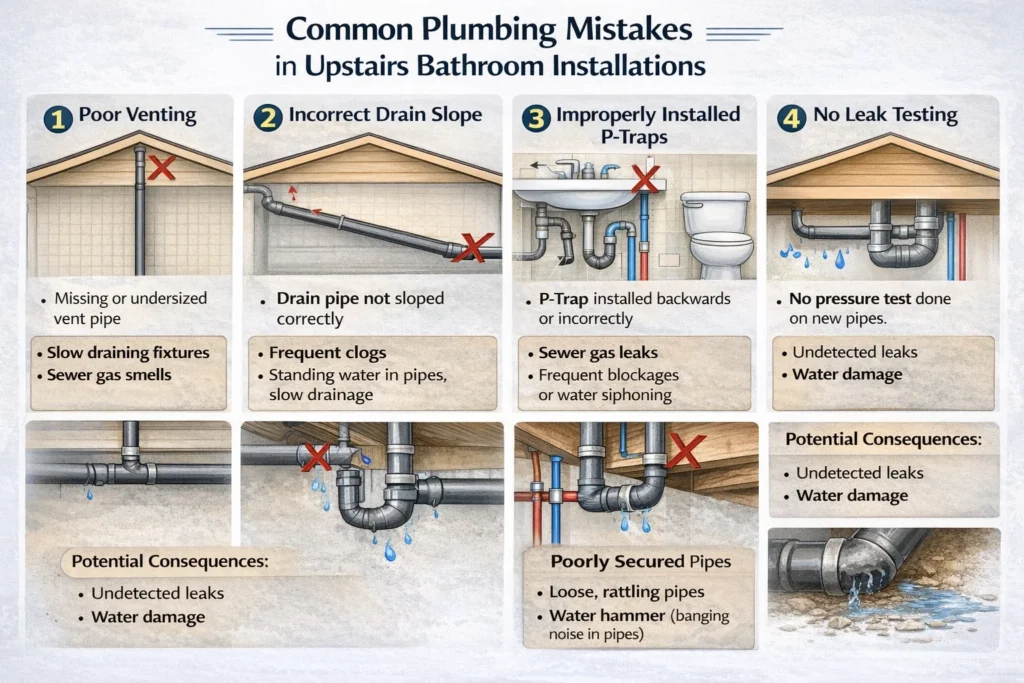
Upstairs bathrooms require careful planning because all drain lines connect to a vertical stack and run through floor framing. A clear 2nd floor bathroom plumbing diagram helps prevent the most common installation mistakes listed below.
Incorrect Drain Slope
Drain pipes must slope slightly toward the main stack. If the slope is too flat, water drains slowly and causes blockages. If it is too steep, solids may remain in the pipe. A proper second floor bathroom plumbing diagram clearly shows the correct slope direction.
Missing or Improper Venting
Each fixture must connect to a vent pipe. Without proper venting, drains may gurgle, empty slowly, or release sewer odours. An accurate upstairs bathroom plumbing diagram shows how vent lines connect to the drain system.
Incorrect Rough-In Placement
If toilet, sink, or shower drains are placed in the wrong position, fixtures may not fit properly. Fixing rough-in errors on the second floor often requires opening finished ceilings below. A well-planned 2nd floor bathroom plumbing diagram prevents this issue.
Undersized Drain Pipes in Shared Systems
In layouts where two bathrooms connect to one stack, pipe sizing must handle combined flow. A correct two bathroom plumbing diagram shows proper pipe diameter to reduce the risk of backups.
When to Hire a Professional for Upstairs Bathroom Plumbing
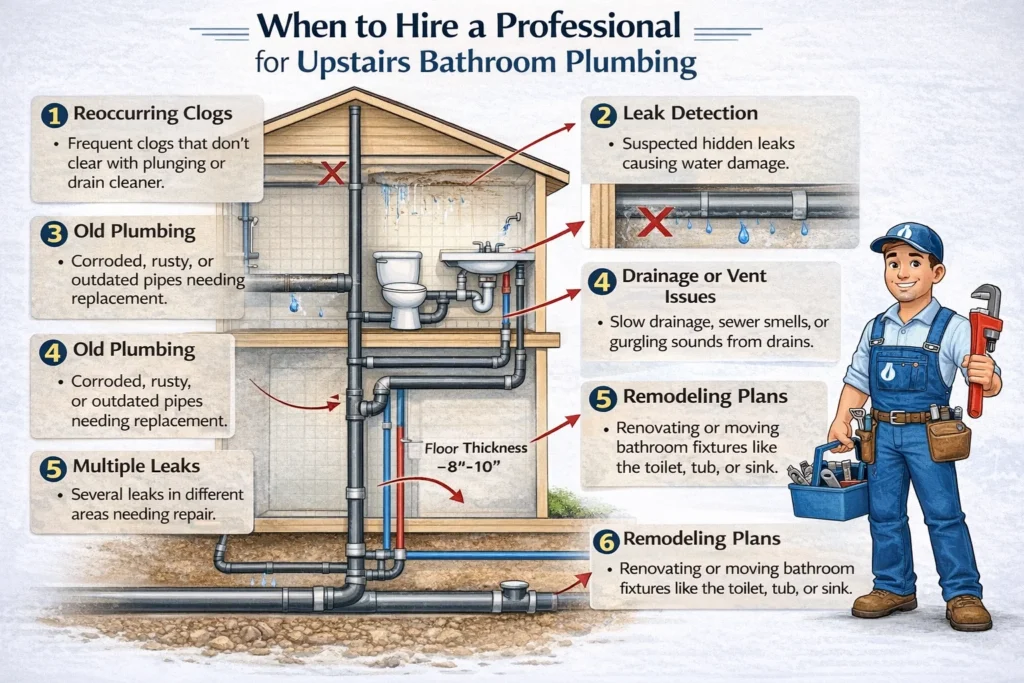
Not every upstairs project should be DIY. If the work involves changing pipes or modifying the layout shown in your 2nd floor bathroom plumbing diagram, hiring a licensed plumber is the safer choice.
When You Are Moving or Adding Fixtures
Relocating a toilet, sink, or shower changes the drain slope and vent connections. A professional can update the second floor bathroom plumbing diagram to ensure proper flow and correct pipe sizing.
When You Are Connecting to the Main Stack
All upstairs drains must tie into a vertical soil stack. If this connection is installed incorrectly, it can cause slow drainage or backups. An expert ensures the upstairs bathroom plumbing diagram is designed correctly before installation.
When Two Bathrooms Share One Drain Line
In layouts with shared plumbing, correct pipe diameter and venting are critical. A properly planned two bathroom plumbing diagram reduces the risk of overflow and pressure issues.
When Permits Are Required
Second floor plumbing renovations often require permits and inspection approval in the GTA. A licensed professional ensures the plumbing layout meets local code.
Ready to upgrade your home with a properly planned second floor bathroom?
Every renovation project comes with important decisions. When it comes to upstairs plumbing, one small mistake in your 2nd floor bathroom plumbing diagram can lead to drainage issues, leaks, or costly repairs later. That is why careful planning and expert guidance matter from the start.
At BathGuys, we focus on smart bathroom design and code-compliant plumbing layouts for Toronto and GTA homes. From accurate rough-in planning to complete bathroom renovations, our team ensures every pipe, drain, and vent is installed correctly and safely.
Whether you are adding a new upstairs bathroom, remodeling an existing one, or adjusting a plumbing layout, we are here to help you move forward with confidence.
Do not take risks with second floor plumbing.
Take the first step today. Contact BathGuys for a professional consultation and let our experienced team help you build your bathroom the right way.
FAQs
-
What is a 2nd floor bathroom plumbing diagram?
A 2nd floor bathroom plumbing diagram is a layout drawing that shows how water supply lines, drain pipes, and vent stacks connect in an upstairs bathroom. It explains how clean water flows in and how wastewater moves down to the main sewer line. This diagram helps prevent layout errors before installation begins.
-
How does plumbing work in a second floor bathroom?
In a second floor bathroom, water travels upward through supply pipes and wastewater flows downward through sloped drain lines into a vertical stack. A proper second floor bathroom plumbing diagram shows the connection between fixtures, drain pipes, and vent lines to ensure smooth drainage and airflow.
-
What are standard rough-in measurements for an upstairs bathroom?
Most toilets use a 12-inch rough-in from the finished wall to the centre of the drain. Sink drains are usually placed 16–20 inches above the floor, and shower drains are typically 2 inches in diameter. These measurements must be clearly marked in a 2nd floor bathroom plumbing diagram to ensure correct fixture placement.
-
Can two bathrooms share the same drain line upstairs?
Yes, two bathrooms can share one drain stack if the pipe size and venting are correctly planned. A properly designed two bathroom plumbing diagram shows how shared drains connect without causing pressure problems or backups. Correct pipe diameter is important for safe flow.
-
Do I need a permit for second floor bathroom plumbing in the GTA?
In most cases, yes. Plumbing changes that involve new drain lines, stack connections, or fixture relocation usually require a permit. A professional can ensure your upstairs bathroom plumbing diagram follows local building code and passes inspection.