

Planning a small bathroom renovation but feeling confused about where the pipes should go? Many Toronto condo owners and GTA homeowners start their project without a clear small bathroom plumbing diagram, and that often leads to costly mistakes, delays, or fixtures that simply do not fit the space properly. In tight bathrooms, even a few inches can make a big difference.
In this guide, we will walk you through a clear small bathroom plumbing diagram with measurements, layout examples, and simple explanations made for Canadian homes.
Small Bathroom Plumbing Diagram Explained (With Visual Breakdown)
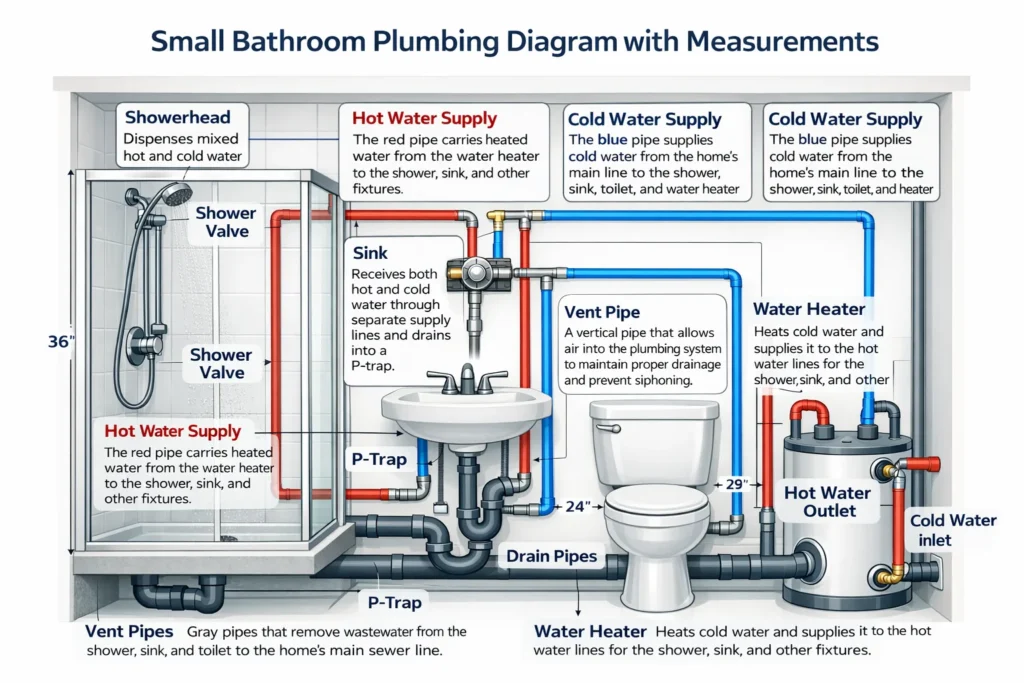
A small bathroom plumbing diagram is basically a simple drawing that lays out the connection points for your toilet, sink, and shower to water supply lines, drain pipes and the pipes that allow air in – the vent pipes. It lays out where the hot and cold water lines go, the drainage system and where your fixtures are hooked up to the rough-ins before any of the walls or floors get closed off.
In a small bathroom, space is tight so the plumbing layout has to be right just to keep the pipes from getting in each others way – this is especially important in places like condos in Toronto and homes in the GTA where most bathrooms are hooked up to the same shared plumbing system running up the side of the building.
Having a clear and accurate small bathroom plumbing diagram with measurements really helps prevent plumbing problems, slow water flow & costly work when you go to renovate. A clear plan in hand makes life a lot easier for homeowners and contractors alike – it helps you guys avoid all the headaches that come from having to redo things because you didnt do it right first time
Small Bathroom Plumbing Diagram with Measurements
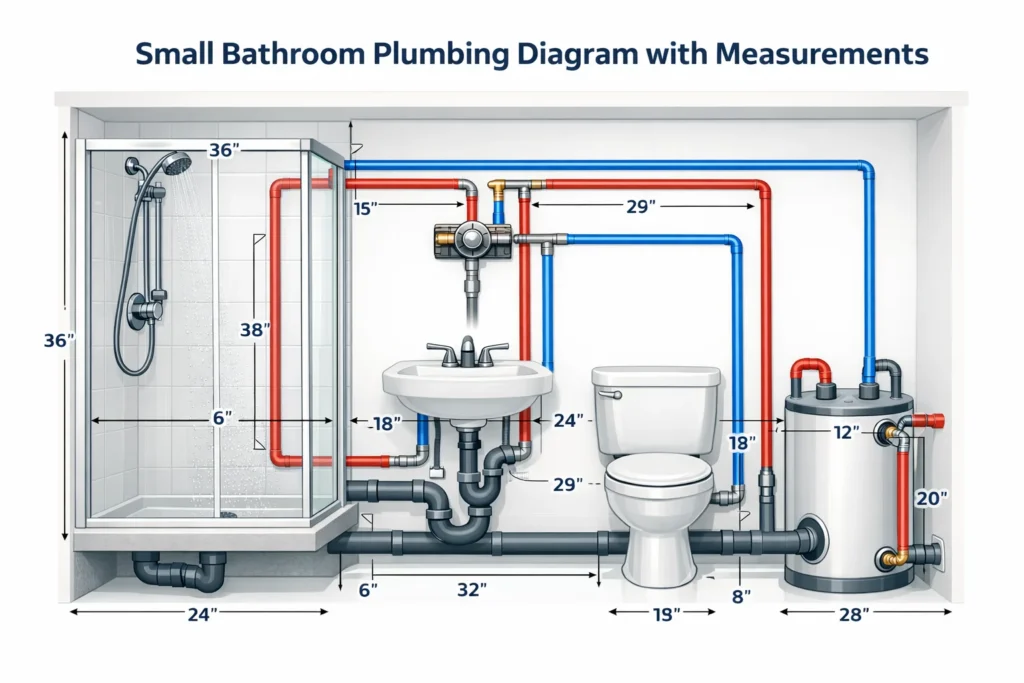
A small bathroom plumbing diagram with measurements shows the exact rough-in dimensions needed for the toilet, sink, and shower. These measurements help ensure proper spacing, smooth drainage, and code-compliant installation in Toronto condos and GTA homes. Even being off by a few inches can cause fitting issues or costly changes later.
Below are the standard rough-in measurements used in most small bathroom plumbing layouts.
Toilet Rough-In Measurements
- Standard rough-in distance: 12 inches from the finished wall to the centre of the drain
- Alternative sizes: 10 inches or 14 inches in older homes
- Minimum side clearance: 15 inches from centre of toilet to any wall or fixture
- Front clearance: At least 21 inches in front of the toilet
These dimensions must be clearly marked in your small bathroom plumbing diagram before flooring is installed.
Sink Rough-In Measurements
- Drain height: 16 to 20 inches from finished floor
- Water supply lines: Around 20 to 22 inches high
- Spacing between hot and cold lines: 4 inches apart
- Minimum side clearance: 4 inches from wall
In compact layouts, proper sink placement prevents crowding between the toilet and vanity.
Shower Drain & Supply Line Placement
For a small bathroom plumbing diagram with shower, drain placement is critical.
- Shower drain: Centered in the shower base or aligned with manufacturer specs
- Shower head height: 72 to 80 inches from floor
- Control valve height: Around 40 to 48 inches from floor
The drain must also maintain a proper slope of ¼ inch per foot toward the main waste line to prevent standing water.
Minimum Fixture Spacing in Small Bathrooms
In tight 5×8 or 3–4 foot wide bathrooms:
- At least 30 inches total width for a toilet area
- Minimum 30 inches clearance for a shower
- At least 21 inches walking space in front of fixtures
These spacing rules should be clearly shown in your small bathroom plumbing diagram with measurements to avoid layout problems.
Common Pipe Sizes for Small Bathrooms
- Toilet drain: 3 inches
- Sink drain: 1.5 inches
- Shower drain: 2 inches
- Water supply lines: ½ inch
Using the correct pipe size ensures proper water pressure and drainage performance.
Small Bathroom Plumbing Diagram with Shower
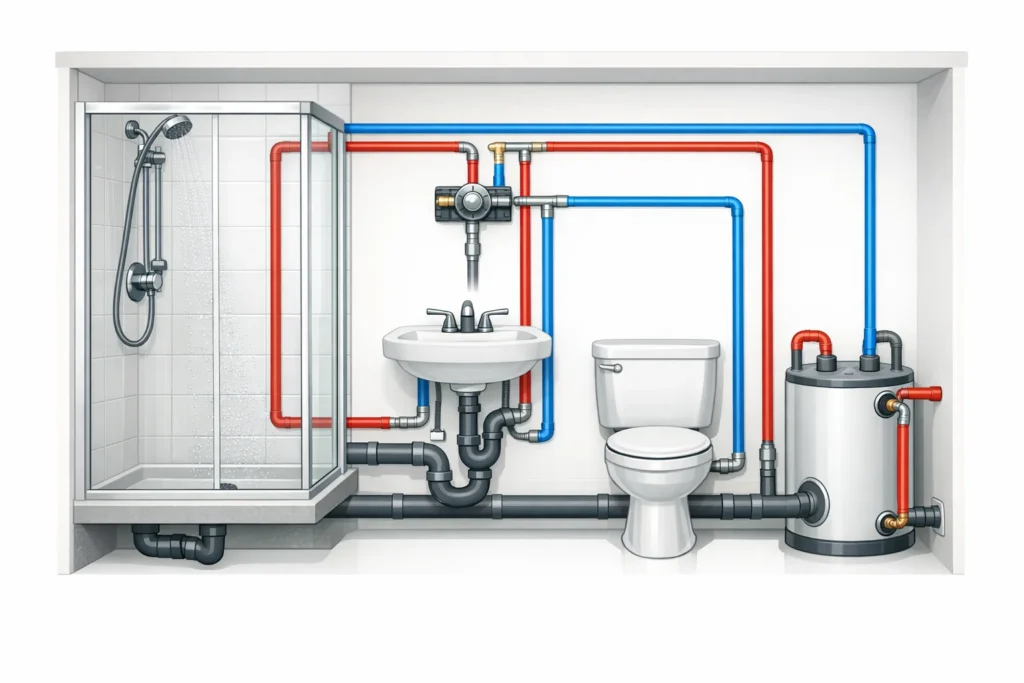
A small bathroom plumbing diagram with shower focuses on placing the toilet, sink, and shower efficiently without a bathtub. This layout is common in Toronto condos and modern GTA homes where space is limited. Removing the tub creates more walking room and allows for a larger shower area.
In this type of small bathroom plumbing layout, the shower usually sits at one end of the 5×8 space or along the back wall. The key is keeping the shower drain close to the main waste stack to avoid expensive pipe relocation.
Standard Layout Example (5×8 Bathroom)
In a typical no-tub layout:
- The toilet is placed 12 inches from the finished wall to the drain centre
- The vanity sink sits beside the toilet with at least 4 inches side clearance
- The shower takes up 30 to 36 inches of width
This arrangement keeps all major plumbing lines along one wall, which simplifies the small bathroom plumbing diagram and reduces labour costs.
Shower Drain Placement
Drain position is critical in a small bathroom plumbing diagram with measurements.
- Center drain is common for square shower bases
- Linear drains are often placed along the back wall
- The drain pipe should be 2 inches in diameter
- Proper slope of ¼ inch per foot toward the main line is required
Incorrect placement can lead to poor drainage or water pooling.
Water Supply & Valve Heights
For a shower-only layout:
- Control valve: 40 to 48 inches from floor
- Shower head: 72 to 80 inches from floor
- Supply lines: ½ inch diameter
Keeping these measurements consistent ensures comfort and proper water pressure.
Why This Layout Works in Condos
A shower-only layout often avoids major slab cutting because the drain can stay near the original tub drain location. In many Toronto condo renovations, this makes the small bathroom plumbing diagram simpler and more cost-effective.
Common Small Bathroom Plumbing Diagram Mistakes to Avoid

A poorly planned small bathroom plumbing diagram can lead to leaks, drainage problems, and costly rework. In small Toronto condo and GTA bathrooms, even small errors can create big issues.
1. Wrong Rough-In Measurements
Placing the toilet, sink, or shower drain in the wrong spot is a common mistake. A proper small bathroom plumbing diagram with measurements must show exact distances before flooring and walls are finished.
2. Incorrect Drain Slope
Drain pipes must slope at least ¼ inch per foot toward the main waste line. Without proper slope, water will drain slowly or clog.
3. Poor Venting Layout
If the plumbing layout does not include proper vent connections, you may experience bad smells or gurgling drains. Every fixture must connect to the vent stack.
4. Overcrowded Fixture Spacing
Not leaving enough clearance around the toilet or shower can make the space uncomfortable and may fail inspection. Always follow minimum spacing guidelines in your small bathroom plumbing diagram.
Cost of Small Bathroom Plumbing in Toronto & GTA (2026 Update)
The cost of plumbing a small bathroom in Toronto and the GTA depends on whether you are keeping the existing layout or changing it. A clear small bathroom plumbing diagram helps control costs because it reduces unnecessary pipe relocation and labour time.
Below is a general cost breakdown for 2026.
Basic Plumbing Rough-In (Same Layout)
If fixtures stay in the same location:
- $1,500 to $3,000 for basic rough-in work
- Includes connecting toilet, sink, and shower to existing lines
- Suitable for most small bathroom plumbing layouts in condos
This option is more affordable because the drain and supply lines remain close to the original stack.
Moving Plumbing Fixtures
If you change the layout shown in your small bathroom plumbing diagram:
- Moving a toilet: $1,000 to $2,500+
- Moving a shower drain: $1,500 to $3,000+
- Full drain relocation: Can exceed $4,000
Costs increase in condo buildings where concrete slab cutting or building approval is required.
Condo-Specific Costs in Toronto
For condo renovations, you may also need:
- Plumbing permits
- Condo board approval
- Licensed plumber documentation
These requirements can add several hundred dollars to the total cost.
What Affects the Final Price?
- Distance from the main waste stack
- Condition of existing pipes
- Type of pipe material used
- Accessibility behind walls or under floors
Keeping your fixtures close to existing plumbing lines in your small bathroom plumbing diagram is the most cost-effective approach.
Plan Your Small Bathroom Plumbing the Right Way
Ready to design your bathroom with a clear and accurate small bathroom plumbing diagram?
Every small bathroom renovation comes with challenges. Limited space, condo restrictions, and strict measurements can quickly turn into costly problems if the plumbing layout is not planned properly. That is why having a detailed small bathroom plumbing diagram with measurements is not just helpful, it is essential.
Here at BathGuys, we’re all about helping Toronto and GTA homeowners design smart, efficient bathrooms that squeeze perfectly into their space. Whether you’re looking at a shower-only design or a compact condo plumbing setup, our team ensures every pipe, drain and fixture is perfectly in place before we even break ground.
Renovating a small condo bathroom or a full house in the GTA can be a nightmare without proper planning. A well-designed small bathroom plumbing layout will not only save you money in the long run, but it’ll also avoid costly delays and make sure everything passes inspection with flying colours.
Do not leave your renovation to guesswork.
Take the first step today and consult with BathGuys to create a plumbing plan that fits your space perfectly. Your stress-free bathroom renovation starts with the right diagram.
Frequently Asked Questions About Small Bathroom Plumbing Diagrams
-
What is the standard rough-in measurement for a small bathroom toilet?
The standard toilet rough-in in most small bathroom plumbing diagrams is 12 inches from the finished wall to the centre of the drain pipe. Some older Toronto homes may use 10-inch or 14-inch rough-ins. Always confirm measurements before installing flooring to avoid repositioning the flange.
-
How much space do you need between a toilet and a sink?
When it comes to small bathroom layouts, you want to make sure the toilet centre is at least 15 inches away from any side wall or fixture. That means you need a minimum of 30 inches total width for the toilet area. Having enough space between them ensures not only comfort, but also helps meet building inspection standards.
-
Can you move plumbing in a Toronto condo bathroom?
Yeah, you can move plumbing around, but it depends on the building structure and where the main waste stack is. Moving supply lines is usually easier than moving drains. When renovating a condo bathroom, changing the layout shown in your small bathroom plumbing plan may require getting approval from the board and hiring a licensed plumber.
-
What size pipes do you use in a small bathroom plumbing layout?
Most small bathroom plumbing diagrams will include a 3 inch drain pipe for the toilet, a 2 inch drain for the shower and a 1.5 inch drain for the sink. Water supply lines are typically ½ inch in diameter. Using the correct pipe sizes is crucial for proper drainage and water pressure.
-
Do I need a permit to change bathroom plumbing in Toronto?
If you live in Toronto or many other GTA cities, a permit is usually required if you’re doing any major plumbing work like relocating lines or altering the drainage system. On the other hand, if you’re just replacing a fixture, you might not need approval. It’s always best to check local requirements before starting your renovation to avoid any problems.